


BogjeDoen / 2019-10-27 14:20:19Past, Present, and Future ProjectsThere have been several attempts to revive the Amiga hardware with modern technology. In addition to the AmigaNG hardware, several projects attempt(ed), with more or less success, to provide modern Amiga hardware:
FPGA ArcadeAmedia Computer sells the FPGA Arcade in a ready-for-use configuration that includes an Antec Vesa 110 Mini ITX case with a SDHC-Card 8GB, an ATX adapter, and a proper backpanel. They can also include the Workbench 3.1 electronic licence as well as the original Kickstart 3.1 file. With this configuration, it is only a matter of plugging the board into a 15kHz monitor and playing!
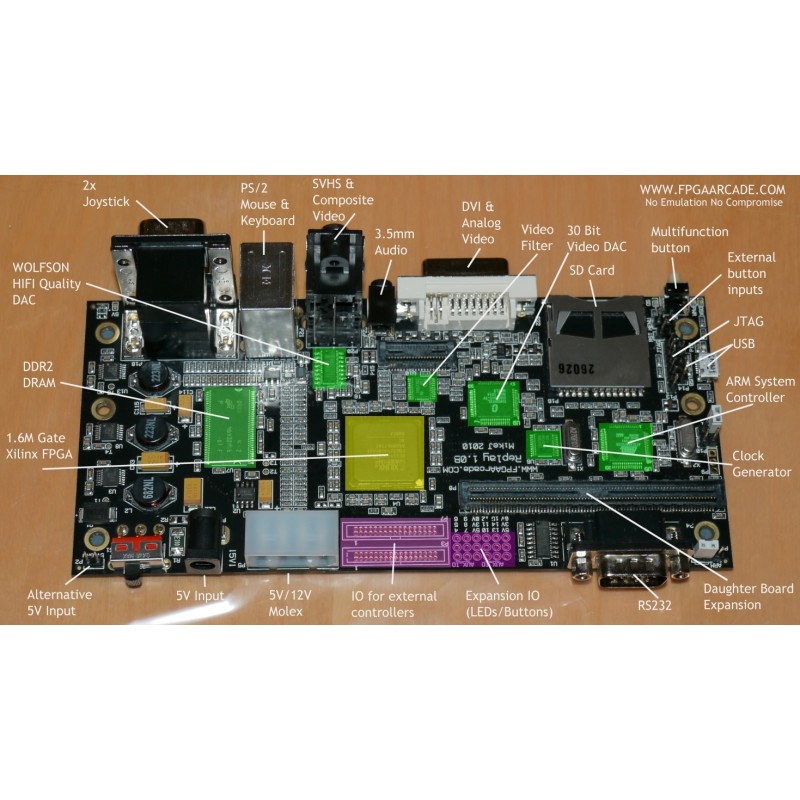
Preparing the SD Card and the FPGA ArcadeA FPGA Arcade is built around a Replay 1 board (Reaply 2 on its way!). The Replay 1 board contains two main chips: an ARM and a 1.6M Gate Xilinx FPGA. The ARM actually starts first and takes care of setting up the FPGA using files on the SD card. Thus, updating a FPGA Arcade means updating the ARM firmware in flash memory and updating the core(s) stored in files on the SD card. The SD card must be formatted using the FAT32 filesystem. Then, it should contain a replay.ini file and a loader that will be read/run by the FPGA Arcade when booting. (Although it is possible to start directly into the Amiga, see later). The loader is available on the FPGA Arcade Web site. There are several posts with various versions Now, put the SD Card into the FPGA Arcade and switch it on. The loader will start and show a control menu (OSD) over a nice background image. From this menu, select a target, which will be one of the INI file available in the folder rAppUpdater of the firmware. Choose the INI file depending on your system (PAL vs. NTSC, 30 vs. 60 fps). After following the instruction (don't loose electrical power during the update!), the latest firmware is now running your FGPA Arcade
Finding, Choosing, and Installing the Amiga CoresThe Amiga cores seem to be only availble in https://github.com/FPGAArcade/replay_release/tree/master/amiga although other cores are available in https://build.fpgaarcade.com/releases/cores/R1/. At the moment, there are three Amiga cores available:
Choose the Amiga AGA core, download it, and install it in its own folder on the SD Card. Modify the replay.ini to match your setup (TV model, etc.) |

 and the latest is hard to find but seems to be in
  .
.